Office 365 - Clearmatch catchall emails
http://social.technet.microsoft.com/wiki/contents/articles/30462.catch-all-mailbox-office365.aspx
How to set up catch all email address on office 365
In order to do this, we need to use a transport rule which imposes a couple of restrictions.
This only works on Office 365 Medium business and Enterprise plans and the new “Business” range. It will NOT work on the Small Business plan as that does not support transport rules.
This only works if all your mailboxes are on Office 365 – it will not work in split scenarios, e.g. Hybrid or mid-staged-migration
It needs the MX records to point to Office 365
The theory is simple – tell Office 365 it is not authoritative for the domain, so it thinks mailboxes exist on other systems. In this way, Office 365 will accept all emails, and if the mailbox does not exist it will forward it (via MX or transport rule) to the next system where the mailbox resides. But, we implement a rule which intercepts the emails before they are sent on, and forwards it to a known email address on office 365.
Part 1 – Tell Office 365 it is not authoritative

Log onto Office 365 admin portal https://outlook.office365.com/ecp (Accessible to Administrator)
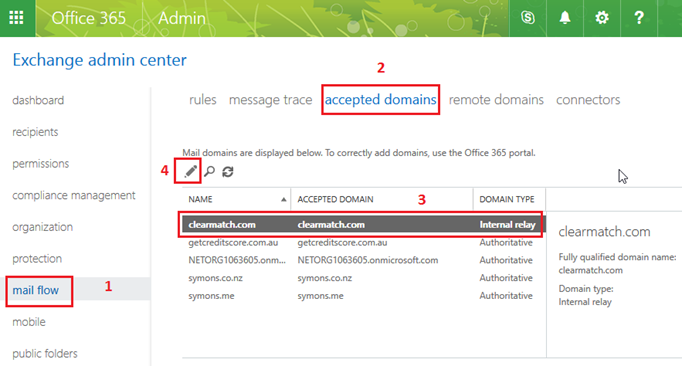
1. Click “Mail Flow” icon
2 Click “Accepted Domains”
3. Highlight your vanity domain and then
4. click the pen (edit) button

5. Change the pop-up from “Authoritative” to “Internal Relay”
6. Click SAVE
Ignore any warning about needing to set up transport rules.
At this point, any message sent to <anyaddres>@clearmatch.com will be received, then bounced back to the MX records and will probably get a mail loop, so now need to set up rule…
Part 2 – Set up divert rule
You need to have a mailbox, shared or normal which is going to receive the catchall mail. We can also use a “group” if it requires to catch-all going to multiple people (not recommended, but you can use a group and just put a single target person in it)
We also need to create a group (e.g. “All”) that directly contains all mailboxes and groups which you do NOT want diverted. Add users/groups individually to this group (do not nest groups). This group MUST contain the catch-all mailbox or catch-all group.

Log onto Office 365 admin portal: https://outlook.office365.com/ecp
1. Click “Mail Flow” icon
2. Click “Rules”
3. Click the “+” icon, then “Create a new rule”
As soon as the new rule box appears, click “More Options…” link towards the bottom of the page
4. Give rule a name, e.g. CatchAll
5. Change the “apply this rule if…” to “The Sender is…”–>”Internal/External”–>”Outside this organization”
6. Add another rule “The recipient address matches…” -> “\w*.documents” (Sandbox: \w*.uat.documents)
7. Change the “do the following…” to “Redirect the message to…”–>”These recipients”–> then select documents@[Finance Company Domain] e.g. ( documents@financecompanyname Sandbox: uat.documents@financecompanyname).
The email address should be match with Clearmatch / Originator Group Product ApplicationBaseEmailAddress, SandboxApplicationBaseEmailAddress)
8. Add another rule “Cc the message to…” -> documents@clearmatch.com
The email address can be configured from Clearmatch / System Settings InboundEmailAddress/SandboxInboundEmailAddress
9. Click “Add Action” then “Modify the message properties”–>”Set a message header”, then set the header to “X-Catchall-Rule” and value to “Yes”
10. Under “Except if”, Click “Add action” then “the recipient is…” then select documents@[Finance Company Domain] e.g. ( documents@financecompanyname) then click Add and OK.
11. Click Save
Wait a couple of minutes for rule to apply, and then test.
Part 3 – Testing
Send an email to validate documents@[Finance Company Domain] e.g. documents@financecompanyname with simulated external email address (ex. QA1234.documents@financecompanyname). It should reach the mailbox including CC’d emails.
Send email to < anyrandom.documents@financecompanyname > and it should be delivered to the catch-all email address specified. If you look at the header of the delivered email, you can see it was the X-CatchAll-Rule that was responsible.

Related Articles
Office 365 - Move unmatched emails to unmatch folder setup
NOTE: YOU HAVE TO CREATE A CUSTOM FOLDER – ‘UnMatch‘ FIRST BEFORE CONTINUING WITH THE TASKS BELOW. 1. Click Settings icon from top right menu 2. Click Mail link from the bottom right menu 3. Click ‘Inbox and sweep rules’ from the Options menu on the ...Clearmatch integration - overview
1. Introduction The Clearmatch platform consists of the following external facing application components: 1. Single Sign On – The single sign on service is a central service where registered users are authenticated. Additionally, the service can ...Overview of the Clearmatch members portal
The Clearmatch members portal is a website that is available for the following participants to access in order to view and manage their details: Borrowers can sign in to: Update their personal details Set personal notification settings for emails and ...Office 365 - API setup
1. Login to https://apps.dev.microsoft.com use admin account create app, note down Application Id, Application Secrets, Redirect URL. 2. Choose Native platform, Setup Microsoft Graph Permissions as below: Read mail in all mailboxes Read and write ...Create a business customer in Clearmatch Fusion
A business customer is any business or organisation e.g. company, trust etc. All details specific to the business are stored against the business customer (with information like address, contacts, bank accounts, etc). When a business customer is ...