Single sign on - possible issues
Logging in with Fusion Account Details
There may be some instances where you have entered your username and password in the Fusion login page:
Then once the Sign In button is pressed, you see this error message on the screen:
The reason for this is the website may have incorrectly redirected to the wrong URL. This can be resolved by simply removing any information after https://fusion.clearmatch.co/
For example, this is what may appear on the URL when you see that Server Error:
After removing any details after the main address as shown in the example below, the issue will be resolved and you will automatically be redirected to Fusion successfully (and you will already be logged in):
If you find that you have not used Fusion for some time and you encounter this error message, the fix provided above will also apply where any information after https://fusion.clearmatch.co/ can be removed NOTE : the screenshot below is from Google Chrome, but the error message will be similar across all browsers:

For example, this is what may appear on the URL when you see that error message:
To resolve, simply remove the Error?/ portion of that website address and you will be redirected to Fusion:
Logging In with Active Directory Account Details
There may be instances where you have linked your Active Directory and Fusion account details and you encounter the following error message (and are redirected to the HTTP 404 Page Not Found web page and cannot access the login page again):
To resolve, you need to clear your cache. Instructions on how to do this are outlined below and based on browser.
Internet Explorer 11
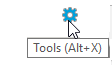
1. Select the gear icon on the top right hand corner of the browser:

NOTE : when you hover over the gear icon with the mouse, the colour changes from clear to blue and has Tools (Alt + X) directly underneath:
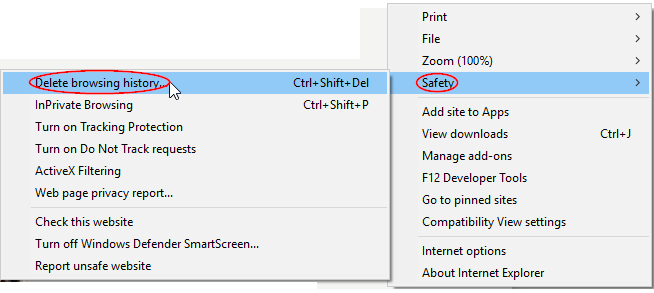
2. From the drop down menu select Safety > Delete browsing history:
3. Enable the tick in the check boxes next to Temporary Internet files and websites files and Cookies and website data and press the Delete button:

4. Once the cache has been successfully cleared, it will show a notification on the bottom of the browser outlining that the history has been deleted:
Microsoft Edge
1. Select the horizontal ellipsis icon (three dots) on the top right hand corner of the browser:

NOTE : when you hover over the ellipsis icon with the mouse, it will show Settings and more :

2. From the drop down menu, select Settings:

3. Find the option Clear browsing data:

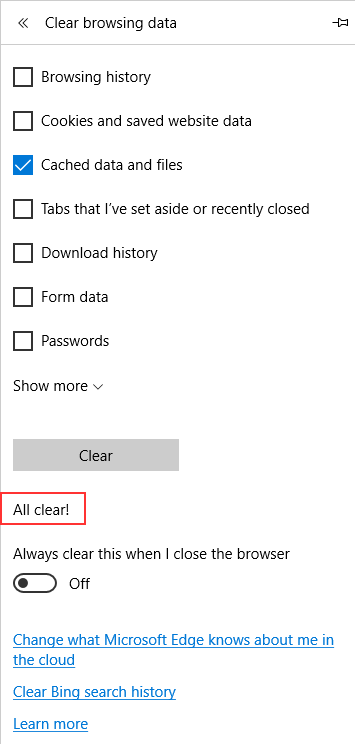
4. Enable the tick in the check box Cached data and files and click on the Clear button:

5. It will then show All clear! directly underneath the Clear button:
Google Chrome
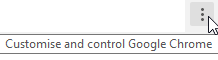
1. Select the vertical ellipses icon (three dots) on the top right hand corner of the browser:

NOTE: when you hover over the icon with your mouse, it shows Customise and control Google Chrome:
2. Select from the drop down menu More tools > Clear browsing data …:

3. Check that the drop down next to Clear the following items from has the time frame that you want to clear cache information from e.g past hour, day, week, month or beginning of time. Also ensure that the tick is enabled in the check box next to Cached images and files and Cookies and other site data before pressing the Clear Browsing Data button:

4. There is no notification or on screen confirmation that the cache has been cleared, it will simply exit out of the Clear browsing data screen and you are returned to the page you were currently on in Google Chrome.
Related Articles
Clearmatch Fusion sign-in
ClearMatch is for the most part written in Microsoft .Net so is therefore optimised to work with the latest version of the Microsoft browser and only up to two versions backwards. For example if the latest version of IE was 11.0, then Clearmatch ...Single sign on - logging into Fusion with your active directory account
1. Use this specific URLto log into Clearmatch Fusion NOTE: it is different to the default Fusion home page as it uses the provider which is what is setup in the section Link Active Directory to Clearmatch Fusion Account. 2. This will redirect to a ...Single sign on - adding Clearmatch Fusion URL to favourites
Internet Explorer 11 1. Open the Internet Explorer browser and navigate to the Clearmatch Fusion home page: 2. This will automatically redirect you to the login page: 3. Click on the yellow star icon (which allows you to view favourites, feeds and ...Single sign on - linking active directory to Clearmatch Fusion account
1. Log in to the Azure portal with the user account details: 2. Select the Azure Active Directory menu option on the left hand side: 3. Look for the Users and groups widget and click anywhere on the widget itself to continue: 4. This will open the ...Release Notes - 201720 - Single Sign On - Sprint 2
Click here to view the release notes